Table of Contents - All Topics Covered Below
- Glide Waxing
- Preparing New & Newly Stone Ground Skis
- Ski Maintenance
- Race Day Ski Prep
- Glide Waxing Tips
- Kick Waxing
- Prepping Kick Zone
- Hard Wax Application
- Klister Application
- Other Applications: Liquid, Powder, Skins
- Miscellaneous: List of Fluro-free Kick and Blister, Stick/Klister Basics
REMINDER: USSA and NENSA (and therefore EMXC) have gone completely fluoro-free. As a team, we are 100% committed to compliance with this protocol. Do not apply fluorinated waxes to your race skis, EVEN FOR TRAINING, and do not apply them using the same space and equipment that you use on your race skis.
Glide Waxing
Preparing New & Newly Stone-Ground Skis
If you have a pair of brand new skis, or if you had your skis stone ground (either at Caldwell or elsewhere), you will need to prepare the skis for use. If you want to skip these steps, you can pay for "Hotbox (aka Heatbox)" and / or "Race Hardening" services from either Caldwell or Bikeway Source. For classic skis, you should wax through the kick zone during this preparation phase.
Step 1: Skis that have NOT been heatboxed.
If you had your skis heatboxed, you can skip this step.

- Scrape off any glide wax on the ski. Wipe ski with paper towel or rag.
- Brush out skis tip to tail using copper or steel brush. 5 strokes. (If you are using a brand new brush, brush about 20 strokes on a pair of rock skis prior to using on good skis.)
- Iron in the warmest wax you have – Swix PS8 or 10, Toko NF Yellow, Star NF Warm, Rode R50. (Remember: Always set iron temp to the specific wax.)
- Let wax cool (20 minutes or until cool to touch) then scrape.
- Brush with steel or copper (5-10 passes) and then soft nylon brush. (For metal brushes, only brush in one direction; mark top of brush top with arrow)
- Repeat steps 2 - 5 once or twice more, for a total of 2-3 layers warm wax.
- Then, move to Step 2.
Step 2: Skis that have NOT been "Race Hardened"
If you had your skis heatboxed but not race hardened, start here. Or, if you've completed Step 1.
- Iron in a cold wax – Swix PS6, Toko NF Blue, Star NF Cold, Rode R20 – being careful not to overheat the ski. When in doubt, move iron more quickly! Never stop a hot iron on top of the ski, and feel for it “grabbing” to know when you are moving too slowly. Pace vs heat is key.
- Allow the ski to cool. Then, scrape and brush, as in Step 1, above. Can add horsehair brush before metal and nylon.
- Repeat steps 1-2 once or twice more, for a total of 2-3 layers cold wax.
- Now the ski is ready for the wax of the day.
Ski Maintenance - Glide
Race Ski Waxing for Training
Race skis should ideally be waxed EVERY time you ski on them, or every other time at a minimum. The best habit is to apply glide wax after the training session, and then scrape it off when you plan to train on the skis again. This way, your race skis are never sitting without wax on them for extended periods of time.
- Remove any dirt or dust with a moist paper towel (especially after skiing on LJM snow!)
- Brush out with 10 strokes of copper or steel brush.
- Iron on the specific temperature wax – usually about 2-3 passes.
- Allow to cool completely, then scrape.
- Brush steel or copper (5-10 strokes) and then soft nylon brush (optional for training skis)
Training Ski Waxing
Training skis should be cleaned and waxed at least weekly to maintain base. If skiing on ice or dirty snow, you might wax them more often, but they do not need wax after every ski. Remember that time at practice is way more important than perfection in glide wax.
- Remove any dirt or dust with a moist paper towel (especially after skiing on LJM snow!)
- Brush out with 10 strokes of copper or steel brush.
- Iron on the specific temperature wax – usually about 2-3 passes.
- Allow to cool completely then scrape.
- Brush steel or copper (5-10 strokes) and then soft nylon brush (optional for training skis)
Race Day Ski Prep - Glide
Race Skis should be cleaned and waxed within 1-2 days MAX after each use (including practice). Race skis should never be used without a fresh application of wax.
- Remove any dirt or dust with a glide wax cleaner (fluoro-free) or a moist paper towel (especially after skiing on LJM snow!)
- If using a glide wax cleaner, scrub cleaner with dedicated cleaning brush (stiff nylon), while still wet. Allow cleaner to dry completely.
- Brush out with 5-10 strokes of copper or steel brush.
- Iron on first layer of wax from the wax call. Use the correct iron temperature specific to the wax. For race weekends, the wax call will be sent out 3-4 days before race.
- Allow the ski to cool completely then scrape with plastic scraper. Note scraping tips, but in addition, careful not to unintentionally scratch the bottoms or edge. (you will see - it happens) It helps to use your free fingers to feel the edge of the ski.
- Brush in order of largest to smallest bristles. This usually means horsehair first, then fine steel or copper, and then a soft nylon brush.
- If second layer of wax from wax call is a powder, start by watching this video about applying powder -- the video is about applying VF4, but the application of NEXT powder is done in the same way (see other videos below).
- Tap out powder along the length of the ski on both sides of the groove. Set your iron to the correct temperature for the powder that you are using.
- Iron along each side of the ski, ensuring that you are moving the iron quickly enough that there are not pools of wax left behind sitting on the ski.
- Allow to cool.
- Scrape and brush ski as normal. Make sure that the ski does not have any “white spots” of wax left on the base after brushing.
Glide Waxing Tips
- Match the iron temperature to wax temperature (listed on the wax container). Should not be too hot or too cold.
- Iron just 2 or 3 times from tip to tail, always moving forward. Never run the iron over already melted wax (eg. wax still in liquid form).
- Place iron flat down on paper towel in between waxing to keep down smoke.
- Keep your scraper sharp. Sharp scrapers are key to reduce the number of passes needed and get better wax removal. Do NOT use the same scraper to remove kick wax and glide wax.
- Do not leave a really hot iron outside in really cold temperatures if possible. Normal ski temps are probably ok. It can cause minor warping and you want the iron flat.
- If you scrape wax and a flat sharp scraper does not remove much of the wax in spots on the ski, try another flat scraper, but in either case do not scrape super hard, rather let the sharp scraper do the work. (Sharpen twice, scrape once). If the same spots are not removed, you can brush it rather than going beserk with a scraper, but it usually means the bases are a bit warped. Most skis have some minor spots like this, but if severe, can be fixed by stone grinding.
- Even without fluoros it is good practice to keep the wax area ventilated if possible. We never know what is in all these waxes and the biggest issue is burning waxes (hence resting iron on cloth at a lower temperature). If your wax area isn't super ventilated, wear an N-95 while you wax.
- Last thing before leaving the wax bench is ALWAYS to double check that you have unplugged the iron. Even if you think you already did it.
Glide Wax Videos
- BNS Glide wax
- Zach Caldwell “Waxing for idiots”
- Solomon Basic Glide
- Zach Caldwell’s Brush Demo - 15 minutes on brushes, that’s all….
- Zach Caldwell’s Video about Powder Application
- Star Wax Powder Video
Kick Waxing
Before beginning to wax skis, make sure that your kick zones were marked by Chris Li at Bikeway source!
Cleaning and Prepping Classic Skis
- Glide wax everything but kick zone as above (use blue painters tape to mark kick zone)
- Goal is to clean the kick zone of all old kick wax and dirt, have a well-marked kick zone and have a kick zone that has been roughed up with fine sandpaper to help the wax adhere to the ski.
- Kick zones can be cleaned with a scraper, wax remover, and fiberlene or coffee filters. Never use the same scraper on your kick zone that you use to clean glide wax.
- It can be helpful to heat stubborn waxes such as cold, hard klisters and warm, sticky hard waxes with a torch or heat gun before scraping. Using heat and a scraper means you will need less solvent to clean the ski.
- To scrape off old kick wax and klister, use a scraper with a beveled edge or lay a paper towel on the kick wax or klister, run an old iron over the top of the paper and then scrape. Klister comes up with the paper towel and wax remover penetrates quicker into warm base or toilet paper. Get rid of any klister mess quickly as it has a tendency to wreck clothing.
- Clean the sidewalls, as kick wax and klister have a tendency to collect there.
- To use wax remover, wet fiberlene (cloth, paper towel sort of works) and rub it into the almost clean ski. (trying to remove thick stick wax or klister with just wax remover is impractical unless it is very thin).
- To sand your kick zone, wrap a piece of fine sandpaper around a cork or brush and sand back and forth with medium strokes from one end of the zone to the other with light pressure. Typically use 150 to 180 grit, but possible coarser (120) for glare ice or finer (220) for sub zero dry powder. The idea is to rough up the base of the ski enough to help the kick wax adhere to the base. Sanding is a must before kick waxing your classic skis for the first time, but may not be needed before every wax job.
Kick Wax Applications

Tips on Stick Wax
- When skis are cold (outside - or while skiing), take a cork and rub it hard on the kick zone. That will get the waxing to stick at least in small amounts. Once wax is sticking, kick waxing gets much easier.
- Warmer waxes come off easily and when using them sometimes a colder wax is put on underneath. This can be a colder stick wax, stick wax binder, or really thin klister in the case of icy traces. Toko Green is the traditional CSU/Weston binder but last year we switched to Vaughti GS Super. Binder layer should be thin and smooth.
- Too much kick is likely better training than too little kick: a) wax tends to shear off over time (ice really takes off wax) b) it is hard to practice striding correctly when you are sticking too much.
- Waxing at 32 degrees is difficult. Once snow glazes the waxing changes. Do not start with a wax that is really warm, but rather choose the temperature carefully by reading the can. Then add a warmer wax when needed. It is harder to take wax off and clumping is really frustrating.
- Always carry wax and cork when skiing.
Kick Wax Videos
Klister Application

Klister Videos
- Caldwell Binder and Base Klister
- Chris Li - basic klister application
- Chris Li - basic klister removal
- BNS Kick wax/Klister/Cleaning
Klister tips
- Be a minimalist - apply thin and stay well within the klister markings for your ski. Much easier to add klister than remove it.
- When applying colder klisters outside, they will freeze. A torch works great, but without power, warm klister in an inner coat (plastic bag helps), in a thermos of hot water, or if desperate, the tailpipe of a car. If too warm it can then run too freely.
- Always let the ski cool down after applying warm klister.
- Sometimes in races we add a thin layer of colder stick wax on top of klister to speed them up. To “cover” the klister with a layer of stick wax, apply the klister and let the ski cool. Then apply a thin layer of stick wax followed only light fast corking (goal is not to mix klister and kick).
- After skiing, remove the klister immediately if possible, otherwise have a paper towel, toilet paper, or plastic/bag wrap to cover the klister and avoid it getting on everything (forever). Hand moisturizer is good at getting it off (or at least minimizing the stickiness) on hands.
Other Wax Application
Liquid glide waxing tips
- For either sprays or applicators, it is easy to put too much on to one part of the ski. Practice at first.
- Read the labels as some glide waxes have to rest for some time, rubbed or brushed w specific tools or other steps.
- We tend to use less liquids except for top coating as historically they have been short on durability and expensive per ski. However, that is changing and it certainly is easier. Just note that these waxes are not all the same.
Videos
Skin Tech Skis
Some skiers use skin tech as it is the latest easy waxing craze. They have trouble in icy conditions and cold powder and they can get soggy in really wet tracks. Also, we always hope to either out wax these skis or use a race type no-wax ski such as zeros (new wet snow). (We make zero like skis by making them “hairy”.) However, they are really easy for training. Note the skins do wear out with a lot of use.
- Prep Skin tech bottoms for glide wax like any training ski outside of the skin kicking zone. Skins or zeros are best around 32 degrees, so a good bet is to wax 32 deg wax.
- Clean the skin tech with a cloth and a liquid skin cleaner by putting the cleaner on to fiberlene or cloth and rubbing the skin. Then try to get it off with a different piece of fiberlean or cloth.
- Treat the skin with a skin liquid per the instructions, especially on really wet snow as it can prevent the clumps or a waterlogged skin.
Fluoro-free list (BNS) 11/2020

Stick and Klister Basics (from Boulder Nordic)

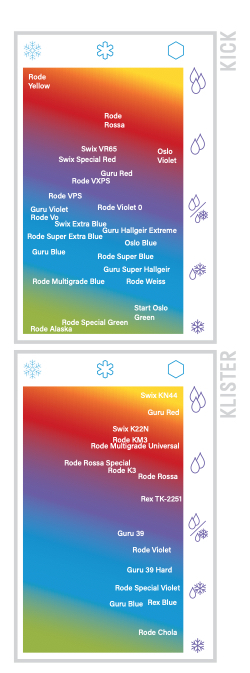
Please note: All graphics containing wax tips are courtesy of Boulder Nordic Sport. The referenced volume is available through the link: Boulder Nordic Sport, Volume 14, 2021-22.